Using Bitwise Operations to Create a Byte Array Representation of a Black and White Image
So for a small project for learning to code in C, I decided to write a simple program that takes a black and white pixel image and converts it to a byte array where each pixel is represented by a single bit. It’s a little bit more involved than I originally thought so it turned out to be pretty good for learning some things about bitwise operations.
So, the first thing you I learned while doing this is that, at the hardware level, the computer can’t create arrays of individual bits, so although you can technically do something like this in a high level language like Python:
numbers = [0, 1, 1, 0];
The minimum space available at any of the memory addresses is generally one byte on modern systems, so ‘under the hood’, these values would really look more like this:
0000000 00000001 00000001 0000000
So, in my case I could technically still use those full bytes to determine whether to turn a pixel on or off, but it seems like a waste of memory doesn’t it? Especially with how RAM prices are right now! So what I wanted to see is, could I write a simple program that would compact the minimum amount of pixel information I need for a bitmap into a sequence of bytes.
Creating The Image
Ok, so the first thing we need to do is actually create some image that we can work with. You can use any program to do this, but I chose to use Gimp because it’s free and open source and is a great alternative to Photoshop. But there are a lot of other options like that too. But anyway, in this example I’m gonna demonstrate using Gimp. Oh, also, because it has a cool feature that lets you export your image directly to a C file, so it’ll already be represented in raw bytes. So here are the steps we need to take to create our image:
- 1. Create the project in a small size, we can upscale the image later but for now, let’s choose 32 x 32
- 2. Go to View > Show Grid so that we can see our pixel grid lines
- 3. Now, go to Image > Configure Grid and set the grid size to 1px by 1px and set the “Line Style” to ‘double dashed’
- 4. Now, just select the pencil tool (you may need to click and hold or hover over the brush tool to see it)
- 5. Draw your image! Keep in mind, the screen we’re using will be black so each ‘off’ pixel will be black and each ‘on’ pixel will be white. So you’ll have to ‘invert’ your drawing if you want it to show up like that because we’re gonna just be drawing black pixels on a white background.
- 6. Alternatively, if you don’t wanna draw an image, you can use a photograph or something and just use the threshold effect to give you only black and white pixels.
Ok, so actually, I just used a photo instead of drawing something and here’s what I came up with.

So now, let’s go to File > Export As, go down to “Select File Type (By Extension)” and choose “C Source Code”. You should get something like your_image.c exported to wherever you chose. Now we can open that file in VSCode (or whatever code editor you prefer) and start writing the program code.
The Issue With This Output
So right of the bat, you’ll notice that there seems to be a lot more data here than is really necessary, and that it doesn’t look very “binary”. Well, it is a sequence of bytes, but it’s in Octal or “base eight” instead of Hexadecimal or Base 2. And the reason why there’s so much of it is that, Gimp being mainly for editing photos and artwork of course is made to edit color images. So the image is in rgb format. This would be great if we needed color information, but we don’t. Because of this, each single black pixel is represented by 3 full bytes of all zeros, and each single white pixel is represented by 3 bytes of all 1s (in base 10 that’s 255 for red, 255 for green, and 255 for blue). Yeah… we don’t need all of that. Again, memory is scarce so we can clean it up a bit. So the first thing we need to do is reduce that rgb data do be either black or white. I chose to do this by just taking the first byte in every sequence of three. Since we know every pixel is represent by 3 bytes which are all the same, we can simply loop through each byte and just take the first of each 3, like this:
#include <stdlib.h>
#include <stdio.h>>

/* GIMP RGB C-Source image dump (IMG_2556.c) */

static const struct {
  unsigned int   width;
  unsigned int   height;
  unsigned int   bytes_per_pixel; /* 2:RGB16, 3:RGB, 4:RGBA */
  unsigned char  pixel_data[64 * 64 * 3 + 1];
} gimp_image = {
  64, 64, 3,
  ...
}


int main() {
    const unsigned int image_byte_size = gimp_image.width * gimp_image.height;

    char *buffer_1 = calloc(image_byte_size, 1)

    for (unsigned int i = 0, j = 0; i < image_byte_size; i ++) {
        j = i * 3;
        if (gimp_image.pixel_data[j] > 0) {
            buffer_1[i] = 1;
        }
    }

    free(buffer_1);

    buffer_1 = NULL;
}
So let’s walk through what we’re doing here. First we include the stdlib and stdio header files so we can use calloc for memory allocation and printf for printing to the console. Then, we have the struct that Gimp generated for us with all the byte data in octal format (I truncated all that here, because it’s ALOT). Then we can finally start writing our program, so here’s what it’s doing.
First, we need to allocate a block of memory that we’ll use to store the first of each pixel’s byte values. We’ll use calloc instead of malloc because it’ll be good to start with all zeros, then we can set each byte that holds a pixel to 1. Then, in our loop, we just loop through once for each byte in that destination buffer, and use another index, j to skip ahead 3 places of “I” on each iteration. (There’s probably a faster way to do this, but this seemed the most readable and straightforward). Then of course, we have to call free() on the pointer we got from the buffer so we don’t cause memory leaks!
So, now we have a fairly smaller representation of the same data, but it’s still wasting space because we’re using a whole byte for each “1” that we’re holding for our image, so we need one more step to compress them down so that one byte can hold multiple pixel values. We’ll do this with bitwise operations.
Bitwise Operations and Bit Masking
So, a really cool thing about C, is t lets us do manipulations at the bit level. There are a few different bitwise operators like AND, OR, XOR (exclusive or), NOT, Left Shift, and Right Shift. They let you compare byte values and get some output based on which operators you use. In this example we only really need two though because we’re gonna use a technique called Bit Masking and all it needs are the OR and the Left Shift operators… I’ll explain.
So first, what the OR operator, represented by the Pipe symbol |, does is lets you compare two bytes and get one back where either of the bytes had a bit in a certain position. So for example, if you compare 0000001 and 0000010 with the OR bitwise operator, you’ll get 0000011 because each byte you compared had a bit set in those positions. The Left Shift operator takes some byte value and a number of places (in decimal / base 10) and gives you back a byte with the bytes in the one you fed to it shifted left by that number of places. So for example if you give it, 00000001 and 2, you’ll get back 00000100 because the 1 was shifted over by 2 places to the left. So if you combine these operations together, you can set any bit in a byte because you can first use left shift to create a byte with a pixel in any specific position, then you can use the bitwise OR to compare that with the byte you want to set the bit in and since your “left shifted” byte has that bit position set, the byte resulting from the OR operation will too! It’s pretty cool. So to code that up, it would look like this:
…
char *final_byte_array = calloc(image_byte_size / 8, 1);

for (unsigned int i = 0, buffer_index = 0; i < image_byte_size; i ++) {
    buffer_index = i / 8;
    if (buffer_1[i] == 1) {
        final_byte_array[buffer_index] = final_byte_array[buffer_index] | 1 << (i - buffer_index * 8);
    }
}

…
So what we’re doing here is first allocating another block of memory that we’ll use to hold our final byte array. Then we’re looping through each byte in buffer_1 (image width x height) to do the bit masking to set each bit in the final byte array. In order to do the bit masking, we need to keep track of which byte we’re using for the bitwise comparisons. We can do that by just dividing I by 8 since we know there are 8 bits in each byte. One other important thing to mention is that we’re doing what’s called integer division here which is kind of a quirk in how C handles remainders when you’re not storing the fractional part of the number. Of course, if we did division with a float and we did 1/8, we’d get 0.125, but since buffer_pos has been declared as an integer, C just truncates the part after the decimal point, so we just get 0. Since it just truncates the fractional part instead of rounding, that means we’ll get a nice solid whole integer from this division in each loop that will tell us the index of the buffer we’re doing operations on.
So, for every byte in buffer_1, we’ll check to see if it’s “on” or set to 00000001 and if so, we’ll create a byte with a left shifted value of 1, shifted over by… a certain amount… let me explain where (i - buffer_index * 8) comes from….
So, this index will grow as we loop so we can’t just use that to shift because we need it to stay within the range of 0 - 7. Since the buffer_index will also be growing every time we iterate through 8 loops, we can just multiply it by 8 and subtract it from the index to give us the amount of spaces we should shift left. This works because we’re only doing this if the value is a one in that buffer position. Then finally, we just OR this with the byte we’re setting in our final_byte_array.
Printing the final byte array to the console
This is all pretty cool, but not so cool if we can’t see it and verify that it actually works right? Unfortunately, C doesn’t have a way to print binary values as a string of ones and zeros, but actually, it kinda fortunate because it gives us an opportunity to learn a little more C! So what we’ll need is a loop that iterates through each byte and prints it out as a string of ones and zeros. So first let’s write the function that will print the data:
…
void printByteBinary(unsigned char byte) {
    for (unsigned int i = 0; i < 8; i++) {
        if (byte & 1 << i) {
            printf("1");
        } else {
            printf("0");
        }
    }
    printf(", ");
}
…
This method takes a byte loops through each one of its bits. In the if statement, we’re using bitwise operators again to check if a certain bit is set based on the index of our loop iteration. For example, in the first iteration, I will be zero so we’ll be left shifting 00000001 by zero and using the AND operator (&) to check if that bit is also set in the byte we fed into the function, if it is, we print the string “1”, if not, we print the string “0”. At the end of our loop, we just ned to print out a comma and a space so we can visualize the groups of 8 bits more easily.
…
for (unsigned int i = 0; i < image_byte_size / 8; i ++) {
    printByteBinary(final_byte_array[i]);
    if ((i + 1) % (gimp_image.width / 8) == 0) {
        printf("\n");
    }
}
…
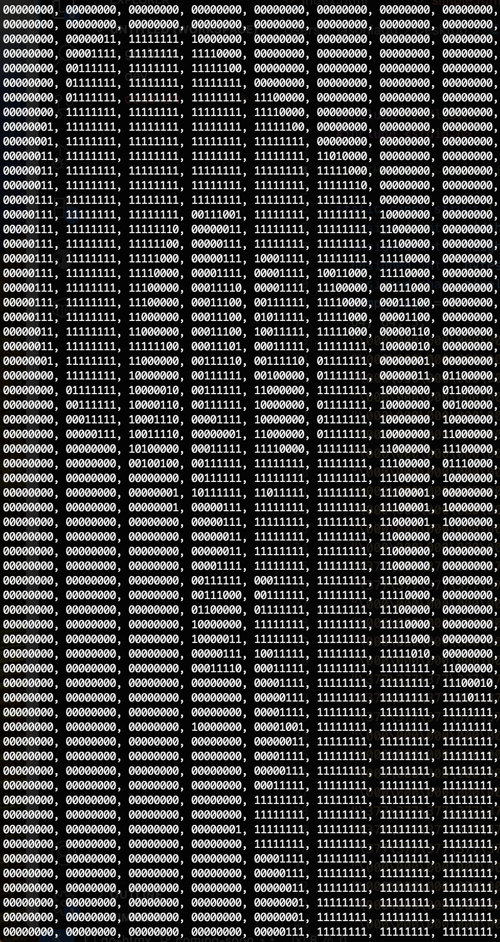
Awesome, now we can see it! So lastly, since we allocated memory with calloc(), we have to make sure to free it so that it can be used by other programs and doesn’t cause a memory leak each this is ran, so we just simply do this:
…
free(buffer_1);
free(final_byte_array);
…
So yeah! That’s pretty much it! This is the most basic version so there are definitely some things that would be needed before it should actually be used in a real project. For example, I’m not checking to make sure the memory allocation calls actually succeeded before continuing, which could lead to some segfaults. So I’ll need to clean up stuff like that, but just wanted to keep it simple for the blog post. Thanks for reading! Here's the final block of code with everything in it.
void printByteBinary(unsigned char byte) {
    for (unsigned int i = 0; i < 8; i++) {
        if (byte & 1 << i) {
            printf("1");
        } else {
            printf("0");
        }
    }
    printf(", ");
}

int main() {
    const unsigned int image_byte_size = gimp_image.width * gimp_image.height;

    char *buffer_1 = calloc(image_byte_size, 1);
    char *final_byte_array = calloc(image_byte_size / 8, 1);

    for (unsigned int i = 0, j = 0; i < image_byte_size; i ++) {
        j = i * 3;
        if (gimp_image.pixel_data[j] > 0) {
            buffer_1[i] = 1;
        }
    }

    printf("\n");

    // use bitmasking to set each bit in the final array
    for (unsigned int i = 0, buffer_index = 0; i < image_byte_size; i ++) {
        buffer_index = i / 8;
        if (buffer_1[i] == 1) {
            final_byte_array[buffer_index] = final_byte_array[buffer_index] | 1 << (i - buffer_index * 8);
        }
    }

    // print the bytes as string
    for (unsigned int i = 0; i < image_byte_size / 8; i ++) {
        printByteBinary(final_byte_array[i]);
        if ((i + 1) % (gimp_image.width / 8) == 0) {
            printf("\n");
        }
    }

    free(buffer_1);
    free(final_byte_array);

    buffer_1 = NULL;
    final_byte_array = NULL;
}
Discussion (0 Comments)